
Diving at Photographer's Reef

The dive site Photographer's Reef also known as JJM Reef is an inshore rocky reef in the Seaforth area of Simon's Town on the False Bay coast of the Cape Peninsula, near Cape Town in the Western Cape province of South Africa.
Understand
[edit]


This site is at a depth which allows long dive times without decompression, is quite small and compact, with a rugged relief and interesting topographical features including several small caverns and swim-throughs, and has a diverse ecology. This is a good site for invertebrate photography. It is near enough to shore and convenient parking for a fit diver to visit from a choice of shore entries, and there are several other small isolated reefs in the vicinity, making the area very suitable for navigation exercises, and it is part of the Long coastal underwater orienteering dive #1 from Pumphouse gully to Noah's Ark to Boulders Beach.
Position
[edit]- 1 Photographer's Reef: S34°11.847’ E18°27.437’
- 2 Beach at Pumphouse Gully: S34°11.945’ E18°27.287’ (entry and exit point)
Bearings for Photographer's Reef:
- 207° magnetic to north point at Windmill Beach.
- 282° magnetic to concrete platform on the rock at Penguin Point (Boulders).
- 355° magnetic to middle of Noah’s Ark.
- 219° magnetic to pole beacon at Windmill Beach
Ranges:
- Approximately 300 m from Penguin Point gully on 097° magnetic.
- Approximately 415 m from Windmill Beach North entry on 033° magnetic.
This site is in a Marine Protected Area (2004). A permit is required. The site is entirely inside the Boulders Restricted Zone.
Name
[edit]The reef is marked on SA Navy charts as "Photographer's Reef". The alternative name "JJM Reef" is from the 1980s and is said to derive from the initials of three divers who discovered the reef as a dive site, and gave it the name: John Hurter, Josh (surname not known), and Mike Wright.
Depth
[edit]Maximum depth is on sand bottom at about 13 m (14 m at high tide), top of the reef is about 3 m.
Visibility
[edit]Visibility is variable and to some extent correlates with wind direction. If the wind has been blowing from the north west, the visibility is likely to be better than if it is from the south east. 10 m would be considered good, but the site is worth diving even when visibility is less, though less than 5 m would be considered poor. Visibility is likely to be better in winter than in summer.

Topography
[edit]Photographer's Reef proper is a compact cluster of high profile granite outcrops and boulders with deep gaps and cracks, deep overhangs, and a few swim-throughs.
There are other reefs in the general area, as shown on the map, but these are lower and lack the complexity of Photographer’s Reef.
Geology: Granite of the late Pre-Cambrian Peninsula pluton. The rock formations at this site are a "drowned granite tor". A tor is an exposed group of weathered rocks, commonly igneous, usually on top of the bedrock, and formed by weathering of the rock along fracture planes. In the case of the Peninsula pluton, the spheroidal weathering is thought to have occurred largely while the rock was below the surface of the soil, and the feature was later exposed by erosion of the softer saprolite, leaving the boulders stacked in approximately their original positions. At the end of the last ice age, the sea level rose to submerge them. A good example of a similar feature above sea level is the peninsula at Castle Rocks
Conditions
[edit]The site should be diveable if Windmill Beach north entry is OK, and in moderate north westerly winds, but be aware that for a shore dive the long swim back may be a problem in an offshore wind. If the wind is blowing from the north west there may be a surface drift which will set you out to sea from your compass course. Check bearings frequently and adjust course to allow for drift. Use back bearings on a surface swim.
Returning on the bottom or in midwater on a compass bearing is convenient if your air is sufficient. (630 litres was enough for the map-maker to swim all the way back to the beach at Windmill on the bottom in a dry-suit. Your mileage may differ). Make sure you are on the right course, and check that the bottom gets shallower. Divers have been known to swim the wrong way and have had to get a lift back from a fishing boat.
The site is usually at its best in winter but there are also occasional opportunities in autumn and spring.
If a strong south east wind comes up during the dive it may make the exit at Pumphouse Gully difficult, and it may be better to swim round the point to Boulders Beach or to use Windmill north cove.
Facilities
[edit]Tarred and demarcated parking area at the north side of the bottom of Bellevue road, usually with attendants. Security is good when parking attendants are on duty. There is a restaurant at the parking area, and clean toilets in good condition at the ticket office to the penguin sanctuary to the north.
Limited parking at the end of Links Rd. This area has a history of vandalised vehicles and theft, and there is a slight risk of being hit by a golf ball. (The parking area is right next to a green of the Simon's Town golf course, separated by a chain-link fence). There are municipal public toilets and changing rooms on the path to the beach, which are usually shabby and not very clean. They include a fresh water shower which sometimes works.
Get in
[edit]

Photographer's reef is usually considered a boat dive. The site is about 4 km from Miller’s Point slipway.
These reefs can also be dived as a shore entry dive from North Windmill Beach or a gully south of the parking area at Penguin Point. Either of these entry areas can be reached by driving south through Simon’s Town on the M4 (Queens Road), and turning left into Bellevue road at the golf course.
Windmill Beach shore entry: Turn right from Bellevue road into Links road, and park at the end. See Windmill Beach site description for entry details. This parking area is small and not secure.
Penguin Point shore entry: There is a tarred parking area to the left at the bottom of Bellevue road, usually with attendants. Park as near to the entrance as possible. Go through the wooden gate in the low wall on the south side of the lower end of Bellevue road, which leads to a path alongside the garden walls of the adjoining houses. This path goes behind a dense thicket, then curves down to the south of a large rock outcrop just off the shoreline. Mind the penguins — there may be nesting burrows under the grass. There is a cubic concrete pumphouse structure to the south of the small entry gully (known as Pumphouse Gully), and the gully has a tiny beach at low tide. This entry area is well protected from waves, but can be rather shallow at low tide.
When there is a wind from the north west, the wind chop can push water between the rocks to the north of the head of the gully, and this water takes the easy way out through the east opening where you would swim to get in and out. Going out is no problem, but the current can make getting back in a bit of work. If you have enough air left the easy way to deal with this is to go down and pull yourself in against the current by using the rocks and kelp for hand-holds. The gully is shallow, and unlikely to be deeper than about 2 m maximum in the part with the current.
Do
[edit]Dive at one of the listed drop points and explore the reef around that point, or follow one of the routes.
1 Photographer's Reef: S34°11.847’ E18°27.437’. Large, rounded, granite corestones rising almost vertically from the flat sand bottom. There are narrow and wide crevices, some from about 5 m below the surface down to the full 13 m depth. There is also a small swim-through cavern at the south west side at the bottom, and another lower one slightly further to the north, also on the west side. A long very deep gully or crack runs magnetic north/south, but is too narrow to swim through without touching the sides below about 6 m, and two wider gullies from the east and north east, one leading to a small cavern and the other to a swimthrough. In the middle of the northern part of the reef is a depression, or bowl, formed where several cracks meet. At the bottom of this is a very low headroom cavern under a boulder wedged into the gap, and a swim-through leading to the west side, between the previously mentioned caverns. These features are shown on the detail map.
2 JJM Junior reef: S34°11.871’ E18°27.459’. This is a low reef about 30 m across the sand to the south of Photographer's. It is about 8.5 m deep on top, and is fairly flat, with no spectacular features. The area is similar to Photographer's Reef.
3 North Photographer's Reef: S34°11.751’ E18°27.394’. A low reef to the north. It is also relatively flat and rises gradually from about 13 m on the sand to about 9 m at the shallowest point. It is of similar area to Photographer's reef and is about 130 m away on a bearing of magnetic north. On the way there are two isolated rocks: the first a long ridge a bit over a metre high with an almost separate end to the south, and the second a low roundish outcrop about 3 m diameter. They are slightly to the east of the direct route. They have been named the "Exclamation mark" and "Full stop" due to their shapes.
4 Compass Reef: S34°11.899’ E18°27.374’. The reef to the south west is "Compass Reef", and it is mostly relatively low and made up of a number of quite small outcrops, except for a section of fairly high reef at the west side of the area, this extends up from the sand bottom at about 8 to 9 m to shallower than 6 m. This reef is a landmark on the way to and from Photographer's Reef if it is dived from a shore entry at Pumphouse Gully.
Routes
[edit]
- Generally considered a boat dive. Boats usually launch from Miller’s Point slipway, and will usually put down a shotline on the sand near the reef to avoid damage to the reef. Dive around the reef and either return to the shotline, send up your DSMB for ascent, or ascend up the reef if conditions are suitable and do your safety stop on top of the reef where there are things to look at while you wait.
- Route from a shore entry at North cove at Windmill Beach: Surface swim from a North cove entry at Windmill beach, using a back bearing of 220° magnetic to the post on the rock near the changing rooms. Swim out until Noah’s Ark centre is bearing 355° magnetic, the concrete platform on the top of the rock at Penguin Point is bearing 282° magnetic, and the north point of Windmill rocks is bearing 219° magnetic. Look for kelp under the surface to confirm you are on the reef. Dive the reef until you reach the pressure required to return underwater (probably about 100 bar on a 12 litre cylinder, but do your own calculation to suit your personal air consumption), then leave from the southern end of reef. Compass swim along the sand bottom to shore on bearing 220° magnetic There are a few small reefs on the way back about half way to the North Point of Windmill Beach.
- Alternative route from a shore entry at the gully south of Penguin Point: Enter at the Pumphouse gully south of Bellevue road. Swim out to just past the group of low exposed rocks east of the long high rock at the north side of the gully. Descend at the east side of these rocks onto the sand and swim about 50 m on a bearing of roughly 45° magnetic until you reach Compass reef. Cross over Compass reef and swim from the east side of the reef on a bearing of 060° magnetic for about 120 m.This should take you to the south west corner of Photographer's Reef near the cavern. On this route you are likely to see a large number of the white Feathery sea pens in the sand in the shallower water, and Purple sea pens as it gets deeper.
- A circumnavigation near the base of the reef, with a visit to the caverns and swim-throughs, followed by exploration along the major cracks and ending on top of the reef is recommended. The more open cracks from west to east are connected to the long deep crack from north to south in the middle of the reef. The deeper faces of these cracks are populated by large numbers of small brachiopods.
A swim round the reef will take about 30 minutes at a leisurely pace. Look into the overhang caverns on the western side of the reef, and in the bowl in the middle of the reef. Refer to the detail map for an indication of where the interesting topographical features are located. Note that some of these are at the base of the reef, and others are a few metres above the sand. Most can be found within the depth range of 8 to 12 m, so a circumnavigation in this depth band should allow you to see most of the features. Keep a lookout up and down so you don't miss any.
The route shown on the map will take you to almost all the topographical points of interest on a single dive of about half an hour, depending on your speed. It includes penetration of a small cavern and transit of several swim-throughs. The route is intended for shore entry dives, but can be done on boat dives, if you find the start point first, which is the overhang cavern at the south-west corner of the reef, at the sand bottom. Start by swimming into the overhang cavern and follow the back wall to the left, where you will exit in a sand bottomed gully. Turn right and swim through the tunnel under a large rock wedged in the gully, and into the small cavern under the bowl. This cavern has several small openings around the sides, but they are mostly too small for divers, so turn around and retrace your path to the sandy gully. Keep the reef to your right and follow the edge of the reef round to the right (north then east). There is a small overhang just round the corner, then a few small outcrops and a gap to the south. skip this, and go on round the next big boulder, and take the gap between this and the pinnacle a bit further to the north west. This will take you through a gully and a small swim-through to a short gully opening to the left (north west), onto the sand. Stay deep, and keep the reef to your right again as you go round a moderately high outcrop and into a narrow gully leading back into the reef. At the far end of this gully is a small cavern to the left which is a bit small to enter. Swim up over this cavern and over the ridge to the next gully, which is narrow and leads back south east to the sand. Then swim along the side of the reef with the rock to your right until you reach a very narrow and deep gully which runs right through the reef. It is too narrow to swim through at the bottom, so ascend to where it is wide enough to transit without damaging the reef invertebrates living on the sides, and follow the crack through the reef. It branches to the left about half way, but continue with the main crack until you reach the bowl at the north end. This is a hollow in the reef is almost surrounded by high rocks. The rock at the bottom is the roof of the cavern you went through early in the dive. To return to the starting point, either swim over the pinnacle to the west, or go back part way along the crack to the branch, and follow this over the reef and down, where it ends just south of the overhang cavern.
See
[edit]Marine life
[edit]Marine life is typical of the area. The reef is heavily encrusted with Common feather stars, Red bait, Red-chested and Mauve sea cucumbers, false corals and encrusting sponges. Areas with dense populations of brachiopods (lamp shells) can be found in some of the deep crevices. Kelp grows on the upper parts of the reef, but it does not reach the surface and is only visible from the surface when you are over the reef. There is a large variety of invertebrates but usually not many big fish.
There are reports of exceptionally large lobster in some of the crevices in the caverns. They are protected, as this site is in a no-take zone.
Also commonly seen in the crevices and exhibiting a certain skill at remaining just out of photographic range, are small numbers of White seacatfish. Very occasionally, the males can be seen mouth brooding marble-sized translucent orange eggs.
At times there may be huge numbers of Red-chested sea cucumbers covering parts of the reef. It seems that the breeding season for these animals is around August, when mind-boggling numbers of tiny juveniles appear at much the same time on many reefs, and coat them with an almost continuous layer of millimetre scale sea cucumbers of a pale pinkish orange. These grow rapidly and by the end of September are near full size at about 2 to 4 cm, and make large areas bright red. At times they are so densely packed that there is no space between them.
 Reef life with Carpet flatworm
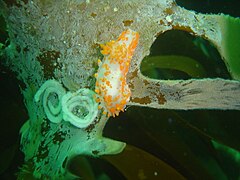 Orange clubbed nudibranch
 Purple sea pens are common on the surrounding sand
 The Pink and yellow sea squirt is fairly common on the main reef
 Red-chested sea cucumbers may be present in dense aggregations


Features
[edit]There are several interesting and fairly spectacular topographic features at Photographer's Reef. These are shown on the detail map, and include:
- Two small overhang caverns, one of which has several boulders partially blocking the opening, so there are several ways in and out.
- One small cavern formed by a large boulder resting on others at the bottom of a gully, with a number of small openings to the outside and other gullies, too small for use as swim-throughs.
- Several swimthroughs formed by boulders wedged into gaps between outcrops.
- Several long narrow and deep cracks between the major outcrops. Some of these provide shelter for fairly large sea fans, and large colonies of brachiopods.
Photography
[edit]As the name implies, this is a good photographic site. Macro and Wide angle lenses are likely to be most versatile.
On most dives the visibility will be most conducive to close-up work, involving macro or wide angle shots of the invertebrates, but if the visibility is good, the spectacular topography will provide opportunities for good scenic views, also most likely to work with wide angle and fisheye lenses. Use widely spaced external strobes for anything other than macro work to minimise backscatter, or on a really good day, try natural light.
Stay safe
[edit]Hazards
[edit]No site-specific hazards have been reported. The security at the Windmill Beach parking area is problematic. Several vehicles have been broken into at this parking area.
Skills
[edit]No special skills are required for boat dives. Reasonable fitness, the ability to navigate by compass, and ability to predict air endurance reasonably accurately are required for shore dives.
Equipment
[edit]A light is useful for looking into crevices and overhangs, a compass is essential for shore dives and a surface marker buoy is recommended for shore dives to indicate your presence to boats in the area. Nitrox could be of value to increase your no stop dive time.
Nearby
[edit]
- 1 Noah’s Ark Rock
- 2 Ammo Reef
- 3 Anchor Reef
- 4 Maidstone Rock
- 5 Torch Reef
- 6 Outer Photographer's Reef
- 7 Penguin Point
- 8 Dangerous Doug Reef
- 9 Lace Reef
- 10 Windmill Offshore
- 11 Windmill Beach
- 12 Outer Windmill
Back to the Alphabetical list of sites, or list of dive sites in the Seaforth to Froggy Pond area
Other regional dive sites:
- Dive sites of Table Bay and approaches,
- Dive sites of the Cape Peninsula west coast
- Dive sites of False Bay offshore and approaches
- Dive sites of False Bay east coast
- Fresh water dive sites of the Cape Town Metropolitan Area
