Diving at Star Wall

The dive site Star Wall or Star Walls is an offshore rocky reef wall south west of Duiker Point in the Karbonkelberg headland area on the Atlantic seaboard of the Cape Peninsula, near Cape Town in the Western Cape province of South Africa. The site includes Star Wall, M&M Cave, and Lollipop Pinnacle.
Understand
[edit]


This site was first recorded in March 2006. It is the tallest and longest wall known in the Cape Town area and is a dive site well worth visiting, with a wide range of interesting and colourful invertebrates and spectacular topography, both on the wall itself an on the adjacent reef to the north.
Position
[edit]- 1 Star Walls pinnacle: S34°02.466' E018°18.087' — Shallowest point on top of the main outcrop at Star Walls
- 2 M&M Cave: S34°02.426' E018°18.191'
- 3 Lollipop Pinnacle: S34°02.506' E018°18.186'
About 200 m roughly south west of the offshore rock at Duiker Point known as "Die Perd".
This site is in the Table Mountain National Park Marine Protected Area since 2004. A permit is required. The site is entirely within the Karbonkelberg Restricted Area.

Name
[edit]The name "Star Walls" was probably chosen with reference to the adjacent site "Kanobi's Wall", as an allusion to the movie series "Star Wars", and to the vertical granite cliff face that constitutes the main feature of the site. The site was discovered and named by Blue Flash charters in 2006.
M&M Cave was found by Monty Guest and Mauro Introna on a scootering dive from Star Walls.
Depth
[edit]Maximum depth at the base of the wall is 32 m, and the top of wall is at approximately 8 m. The pinnacle on top of the rock is at about 5 m.
Most divers would be likely to spend most of the dive at depths between about 24 m and 12 m, as this is where there is most to see, both in terms of marine life and interesting topographical features, and it is in the relatively surge free zone. An average depth of 18 to 21 m would be appropriate for dive planning.
Visibility
[edit]Visibility is variable, as with all sites in the region. On a really good day it may exceed 20 m, and will then usually be very cold. These conditions normally occur in summer, when upwellings driven by the strong south easterly winds bring cold, clear, deep water to the surface. The good visibility does not often last long, and is usually followed by a plankton bloom soon after the wind dies down. More often the visibility is less than 10m, and it is quite commonly around 5 to 8 m in ordinary diving conditions. Of course it can easily be worse, and may be as low as 3 or 4 m, even if the conditions otherwise look good. This means that you just have to look closely at the critters, and for this a light is useful.
Topography
[edit]Star Wall is a massive and continuous almost vertical granite wall of about 25 m height, extending for a length of approximately 100 m west to east on the south face of an enormous outcrop, with an extra 50 m length of wall on the south-east face. The bottom of the wall is on sand patches amongst large boulders. The rock of the wall is fractured by a number of joints which have weathered to form crevices and small undercuts. These joints are mostly vertical and horizontal, and a few are fairly deeply indented, providing more protected local micro-environments, and which typically are more heavily encrusted with invertebrates.
The reef to the south is relatively low, with a few outcrops extending above 27 m, and two small pinnacles above 24 m. There is an outcrop several metres high very near to the eastern end of the wall, and this extends eastwards several metres, like a low extension of the wall.
The western end of the wall makes a sharp turn towards the north, and the top is deeper in this area. This becomes a deep gully parallel to the south face, between the wall outcrop and the rest of the high reef further north.
The south wall is the deepest face of a huge outcrop, which is relatively flat on top, sloping from a high point to the east at about 5 m depth, down to about 9m at the extreme west.
The top is interrupted by two major cracks. One forms a gully a few metres deep near the east end, which runs from near the south east corner to the north side, and the other is roughly parallel and about half way along the top. Both slope down to the north, as does the top in general.
The south east face is also a wall, and is separated from a somewhat lower outcrop further east by a fairly narrow gully with a slightly shallower bottom, which slopes up to the north east, then forks into several gullies.
The north side is more indented and broken up, and slopes down less steeply, to a bottom depth of between 15 and 21 m. There are several small caves and swimthroughs in this area, particularly toward the east, and though there is no massive wall, the topography is varied and complex, with large boulders, gullies, crevices and overhangs.
Reef to the north of the wall — The reef is nearly continuous below 18 m to Kanobi's wall to the north, with a number of high pinnacles, some of which are shown on the map.
On the west side the reef is divided by deep gullies or gaps running from west to east, and eventually continues to the north of Kanobi's reef. This part of the reef is virtually unknown. The east side between the East face and Kanobi's is better known, mainly around M&M pinnacles, but large parts are not yet mapped in detail.
The reef just to the north of the east wall is an area of deep gullies, high pinnacles, huge boulders, overhangs, holes and occasional swimthroughs.
Just north of the east wall, a gully forks and turns west behind the Star Wall outcrop, and is obstructed by a huge boulder with a hole under it which looks big enough to swim through. This may come out at the east end of the gully cutting across the reef from the west. The gully continues north for a moderate distance.
There is a very high profile area north of the main outcrop, with lots of cracks and high points concentrated in a fairly small area.
The east branch of the gully opens up as it continues north. Eventually if you remain at about 18 to 21 m you will get to the east side of Kanobi's reef, passing several high pinnacles on the way, and if you go deeper and further east roughly opposite the second pinnacle, you may find the M&M cave, which is slightly deeper.
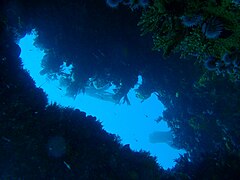
M&M Pinnacle and Cave — Somewhat to the north east of the wall, at S34°02.409' E018°18.189', the M&M pinnacles rise from the edge of the eastern sand patch at roughly 24m depth to about 10m on top. They have near vertical walls on at several sides, especially along the gap between the pinnacles and the cave rocks. This gap extends almost all the way to the sand bottom depth and is several metres wide. There is a overhang to the north west and a swim-through to the east under one of the rocks crossing from north to south, which is partly obstructed by a boulder but can be passed on either side. The largest boulder of the group has a hole through it (the Orifice) and a bowl-like depression towards the northern corner, which is probably the result of corestone weathering in the distant past.
Across the gap to the south of the main pinnacle group, At S34°02.426' E018°18,191', the M&M Cave swimthrough is large enough to turn a scooter inside. The position is shown on the map as M&M Cave. The cave is between 22 and 24 m deep and has access from several sides. It is under a large flattish boulder propped up against other large boulders in a small group. The top of the highest of these boulders is probably about 19m deep.
The name is made up from the initials of the divers who found it and marked its position, and has been extended to the group of pinnacles in the immediate vicinity. There is a memorial plaque to one of them in the cave.
These pinnacles are very close to the edge of the large eastern sand patch at about 24 m depth.
The eastern sand patch is quite extensive, and split into several tongues which extend among the boulders in several directions. It is consistently about 24 m deep, and bordered mostly by fairly low boulders with low Laminaria on top. In some areas the sand and boulders cover the bottom about evenly, in others the perimeter is more distinct.
Lollipop Pinnacle — About 150 m to the south east of Star Wall, at the edge of the southern sand patch, and about half way to Sunfish pinnacle, is a monolithic boulder resting on top of the bedrock reef at about 25 m depth. The pinnacle rises to a minimum depth of about 10 m, and is roughly 20 m in diameter. It was named by the first group of divers recorded to have dived this pinnacle.
Southern sand patch — A few metres to the south of the Lollipop Pinnacle, the edge of the reef drops down to sand at a fairly constant depth of about 34 m. This border extends for some distance to the west of the pinnacle, and at least as far as Sunfish Pinnacle to the east, in a moderately flat curve from west to east.
Sunfish Pinnacle — About 300 m east of the Star Wall reef, on the far side of the western sand patch, there is a pinnacle that comes up very close to the surface, with quite deep water around it. This is described in a separate article.
Kanobi's Wall — The northern pinnacles of the reef behind (to the north) Star Wall. Marked by a half tide rock.
SURG Pinnacles — A group of deeper pinnacles to the west of the main reef, north of Star Walls.
West Wall is a lower wall to the west of the back reef, south of SURG Pinnacles. It is the south face of a ridge which is about 20 m deep on top, with a maximum depth a bit below 33 m. The north face is much less steep and not as deep.
Geology: Granite of the late Pre-Cambrian Peninsula pluton. Occasional patches of fine white sand
Conditions
[edit]Surge — The site is exposed to south westerly swells, which can produce a strong surge over the top of the wall and pinnacles, some of which may break in moderate seas. Surge is usually much weaker in deeper areas, particularly on the face of the wall, which lies across the wave fronts of the prevailing swell.
Currents — At times there is a slight current along the wall, which has been known to run opposite to the prevailing south easterly wind. Currents may also develop across the wall, over the reef, probably due to local winds, as they are short lived and unpredictable, and progress against the current will be relatively strenuous, but the main strength of the current is usually at the surface and down on the reef it is usually much weaker. It can be quite tricky to pick up divers from the water if the swell picks up during the dive, specially if the wind or current is setting you onto the blinders at Kanobi's reef to the north. A current of approximately 1 km/h setting magnetic south has been measured on a day of light south eaterly to easterly wind, and two days later a north setting current of similar strength, also with a south easterly wind.
Temperature — The water will usually be cold. Temperatures are generally 12°C or less, but have not been recorded lower than 8°C. 14°C would be considered unusually warm. A thermocline of one or two degrees may occur, and this is often associated with a change in visibility.
Seasonal variations — Conditions suitable for diving this site will be most common in summer, but any time when the south westerly swell is weak and low may be suitable, though visibility may be more unpredictable in winter.
Upwellings and plankton blooms — This is an area which sometimes has upwellings, caused by the south easterly wind, which generally bring in cold, clear, nutrient rich bottom water. This will usually develop a plankton bloom over a day or two of good sunshine, which will reduce shallow water visibility again. This means that the best times to dive are during or directly after an extended period of moderate to strong south easterly winds, and this generally happens in summer. A plankton bloom which reduces surface visibility to 2 to 5 m may well only extend down a moderate distance, and the visibility below will usually be better. The depth of the bloom is unpredictable and may range from around 5 or 6 m to about 20 m. Light levels below the bloom are often drastically reduced, and the colour tends to be very green.
Adverse weather — Moderate to strong winds with a significant westerly component, or large swells or wind waves from the north west to the south west are likely to produce unsafe or unpleasant conditions, and should be avoided.
Get in
[edit]The site can only be accessed by boat. It is about 6.6 km from the slipway at Hout Bay harbour. The ride will usually take 10 to 20 minutes, depending on the weather. It there is a strong south easter, the ride back will be relatively wet and bumpy. It is usual to fully dress in your wet or dry suit before leaving the harbour, though gloves and hoods may be left until you reach the site. Completion of kitting up and pre-dive checks are done on site.
See
[edit]Marine life
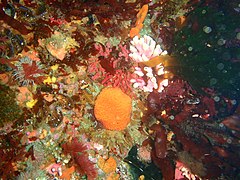
[edit]Typical of the big reefs of the Atlantic coast. Heavy growth of red bait and kelp on top. Walls, crevices and overhangs are covered with a large variety of sponges, corals, ascidians and other sessile invertebrates, and a host of small mobile critters, many of them well camouflaged.
There is a marked difference between the benthic ecology on the more vertical parts of the reef and the flatter areas. The walls and slight overhangs in the 12 m to 24 m range probably have the most diverse invertebrate cover, and certainly the most colourful. There are large numbers of small gorgonian sea fans, noble corals, soft corals, hydroids, anemones, sponges, colonial ascidians, and bryozoans, providing shelter and food for more mobile invertebrates, The predominant colours are oranges and browns, with splashes of bright blues, yellows, pinks and an occasional touch of green. The depth range from about 15 to 21 m is probably the most colorful.
The high parts of the reef tend to be covered by extremely dense cover of the solitary ascidian Pyura stolonifera, commonly known as Red Bait, and much of the flatter surface above 20 m has split-fan kelp forest. The deeper flattish surfaces are relatively sparsely covered, with sea cucumbers and sea urchins as the more obvious cover, and a variety of encrusting sponges and coralline algae
The Sumo crab which often carries a "hat" of the Green-moon sponge has frequently been seen on the wall.
Star wall
[edit]-
 Small basket star on a nippled sea fan
 -
 Lace false coral with Gas flame nudibranch
 -
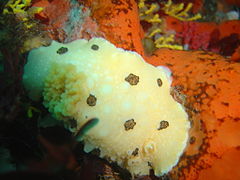 Mandela's nudibranch
 -
 Pair of cuttlefish
 -
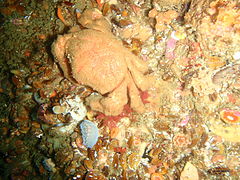
 Sumo crab wearing a Green moon sponge hat for protection
 -
 Reef scene at Star Wall
 -
 A pair of basket stars
 -
 Reef invertebrates typical of the 18m contour
 -
 Sandy anemone and Strawberry anemones
 -
 Noble coral and sponges


M&M pinnacles and cave
[edit]-
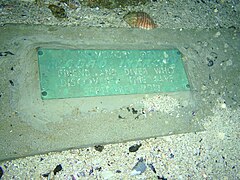 Mauro Introna memorial plaque at the cave under the M&M pinnacles
 -
 Weathered hole through the granite of the northern pinnacle at M&M pinnacles
 -
 Highfin klipfish at M&M pinnacles
 -
 Multicolour sea fans at M&M pinnacles


Lollipop pinnacle
[edit]-
 Invertebrate cover near the top of Lollipop pinnacle
 -
 Orange choirboy ascidians
 -
 A Sumo crab on Lollipop pinnacle


Features
[edit]The longest and highest unbroken wall dive known in the Cape Peninsula. It is about as high as a 7-floor building and longer than a football field. There are a few small cave/swimthroughs to the north of the outcrop, and a larger cave to the north east.
Photography
[edit]This is a great site for invertebrate photography. Most of the subjects will be lass than 250 mm long, and there may be some much smaller, with a large variety in the 20 to 100 mm size range.
If the visibility is good, there may be opportunities for some fairly spectacular scenic shots, with or without divers, and you may be visited by a seal. Occasionally divers have been briefly visited by Dusky dolphins during their safety stop.
Macro and wide-angle equipment are most suitable, and super-macro may also be appropriate. The reef is exceptionally colourful, particularly in the 15 to 25 m depth range, where the most of the red and orange light will already have been absorbed by the water, so good artificial illumination is recommended to get the most out of wide angle shots, as a large amount of the reef fauna is bright reds, oranges and yellows.
Routes
[edit]Find out which way the current is running (if any) and drop in on top of the wall. Swim over the edge and descend to the depth of your choice.
- If you have not dived the site before, there is plenty to see on the south and east faces of the wall. Start deep and work your way up, inspecting the various zones and working your way along the face with the current. Swim away from the reef before deploying your DSMB at the end of the dive to keep clear of the surge at the top.
- A visit to the gulleys to the north of the wall is an interesting alternative. descend to about 18 m at the face of the wall, and swim around the reef with the wall to your left. You will pass along the east wall, then turn to the west into a gully with high reef on both sides. The gully opens up to the north, but stay close to the reef to your left at about 18 m depth, and you will soon come to a huge boulder with a tunnel under it. You can see through the tunnel, which appears to open slightly deeper on the other side. It is not known at this stage whether it is big enough to swim through. From here you can either go further north up the rest of the gully and then explore the uncharted areas beyond, or cross over or through the tunnel and continue around the back of the wall outcrop.
- If you want to try to find the M&M cave, start as for route 2, but instead of taking the left fork, go right and continue due east magnetic until you reach the sand patch, then follow the edge with the reef to your left at about 24 m depth until you see a group of large rocks to the left. The cave should be under the large rock closest to the sand. A few metres further along the sand edge is another large rock with a swimthrough under it. This is part of a small group of huge boulders known as the M&M pinnacle.
Stay safe
[edit]Hazards
[edit]The site is in a very exposed area and one should not dive there if there is big swell or strong wind. Skippers beware of the pinnacles as some of them may break unexpectedly if there is swell or a low tide. This is a particular problem when the swells are in "sets", as there may be a long period where the swells are low and well behaved, followed by a few big ones, which can lift and break without much warning, and can be quite stressful if the boat is over the top of the reef at the time.
For this reason it is quite common not to use a shotline. The wall is big and easy to find, and if the swell is marginal it is better to drop off the boat a short distance to the south of the wall to avoid the lumpy seas and strong surge on top. The wall is then found by simply descending to about 15 m and swimming north. Ascent in these conditions is also safer if you swim away from the wall to the south before ascending on a DSMB.
Other hazards are cold water and strong surge, especially around the pinnacle. Strong offshore winds may develop over a short time in summer, but these are usually forecast.
The currents are not usually a hazard to the diver, but they could drift you to a place where the boat can not safely approach. If this happens, you will just have to wait until you drift to a better place before being picked up. Avoid the exposed rock at Kanobi's, where you could be banged around by breaking seas.
Skills
[edit]It is possible to restrict oneself to depths above 18 m if one's buoyancy control is good, but most boat operators will probably insist on certification for at least 30 m, as the main feature of the site is the wall, and divers who are not certified to 30 m are not usually good enough at depth monitoring and buoyancy control to dive on a wall. This is unfortunately also often the case with divers with more advanced certification, and anyone who is not both competent and confident of their competence at precise buoyancy control should avoid this site, both for their own safety and for the protection of the more fragile reef organisms.
Ability to deploy a DSMB from mid-water is strongly recommended, good buoyancy control is essential.
Equipment
[edit]A DSMB is useful if you surface away from the shot line or there is no shot line. It should only be deployed at a distance from the wall were it is unlikely to be dragged over the top by surge or current, which could snag the line and possibly damage the reef biota. Diving with a standard SMB is not recommended unless you have a really good reason and are adequately skilled to avoid entanglement of the line on the top of the wall. This requires constant vigilance, significant line tension, and usually requires staying a couple of metres away from the wall.
Nitrox can significantly extend your dive time if you are well insulated, and a dry suit is recommended as the water will be cold. If you have a full face mask, it will help on the really cold days, but most divers just allow a few minutes for their face to get used to the cold.
A dive light is worth taking along, as if the surface water is turbid or the lighting is just gloomy due to depth, it may be fairly dark in the deeper areas, and artificial lighting will bring out the bright reds, oranges and yellows of the invertebrates on the face of the wall. A wide angle light beam is best, as it allows close up examination of the organisms while illuminating enough of the surface that you don't have a tiny hot spot on a generally dim background.
Nearby
[edit]
- 1 Die Middelmas
- 2 Twin Towers
- 3 MV Ker Yar Vor and the Jo May
- 4 SS Maori
- 5 SAS Gelderland
- 6 SS Oakburn / MV Bos 400
- 7 Die Perd
- 8 Kanobi’s Wall
- 9 SURG Pinnacles
- 10 Sunfish Pinnacle
- 11 Canyon
- 12 Stonehenge Dusky Pinnacles - Coral Pinnacle
- 13 Stonehenge Blinder
Back to the Alphabetical list of sites, or list of dive sites in the Outer Hout Bay area
Other regional dive sites: